Time needed to complete: about 2 hours
Level of difficulty: 2 out of 5 (in my opinion...I'm unaware of any official craft difficulty rating scale!)
Supplies needed:
-5 sheets of coordinating scrapbook paper, in 12x12 size
-Star pattern, but enlarged to 5.5 inches across link to star pattern
-Paper slicer (I used my old but faithful grey and orange Fiskars one)
-Ruler
-Glue stick
-White school glue that dries clear
-Scissors
-Needle
-Clear thread
Directions:
Step One: Choose five coordinating 12 x 12 scrapbooking papers. I used what red and blue papers I had handy at home: 2 solids (Celestial blue by Wausau, Re-entry red by Wausau both bought in a multipack at Target) and 3 patterns (orange-red dots are Peach Crisp by lilybeedesign, Indian looking design is the back side of Peach Crisp, and blue with light blue polka dots is by K&Company bought in a patterned multipack at Target)
Step Two: Using a craft cutter, cut four strips off the edge of each paper, 3/4 inch wide each by 12 inches long. You’ll end up with 20 strips total (4 of each of the 5 papers).
Step Three: Glue two matching strips together by overlapping them about half an inch and using the glue stick. Do this to all the strips so you end up with 10 long strips instead of 20 shorter ones.
Step Four: Print and cut out the star pattern.
Step Five: Using the pattern and what's left of the paper, cut out four stars of each paper, for a total of 20 stars.
Step Six: Take one of the paper strips. Make a fold half an inch from the end of it to form a little flap.
Step Seven: Measure just under 2 inches from the fold and make another fold (I folded it at two sixteenths away from two inches.
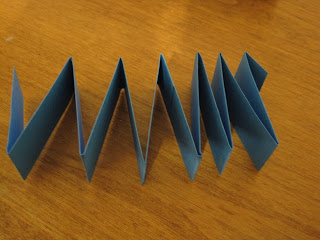
Step Eight: Fold the rest of the strip up, accordion style. Crease well to make the star’s corners sharp.
Step Nine: Bend the paper around to form a star, and cut off the extra paper, at a fold. How do you know what to cut off? Make sure your star will have just 5 points, and do not cut off the flap! Using a glue stick, glue the flap down to close up the star.
Step Ten: Apply a thin line of white school glue (glue stick doesn’t stick well for this) all along the surface edges of the folded star, then stick one of the flat stars onto it, with the flat star sticking out over the edges of the folded star a little. (Notes: It helps the glue come out slower and thinner if you open the bottle only part way. I used a different paper for the edges of the star than the front and back, to make the stars more colorful.)
Step Eleven: Let it dry for a few minutes, holding it in place as needed.
Step Twelve: Flip your star over and apply glue to the other side, then apply another flat star.
Step Thirteen: Repeat the process to make all 10 stars.
Step Fourteen: Carefully run a needle with clear thread through one of the points of each star to make them into a garland. Tie a knot and a loop at each end of the string, hand up your garland, and let the festivities begin!


Really cute! And, slightly different w/the 3-D looking garland! I'm deff. making this one!! Tanks
ReplyDeleteThanks for your sweet comment, Jennifer! I hope that yours turned out awesome!!
ReplyDelete